Embedded QA (EQA) Accumulator
Change accumulators in Embedded QA with standard accumulators
Accumulator Specifications:
Technolgy: NiMH (EXTREMELY IMPORTANT)
Type: Mignon AA (HR6), 1.2V, diameter 14mm, length 50.5mm
Charge capacity: 2'500 to 2'900 mAh
Example of compatible accumulators is:
BE CAREFUL: Replacing with wrong batteries may result in the destruction of your device and voids the warranty.
Please make sure that the accumulators you buy have not been in stock for too long (6 months) without being charged as they may already be damaged.
Follow the steps or the video below carefully:
- Buy new accumulators according to above mentioned specifications. Be careful: replacing with wrong accumulators may result in the destruction of your device.
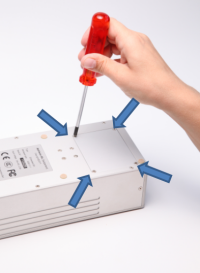
- Use a screw driver to open the accumulator compartments (see pictures below)
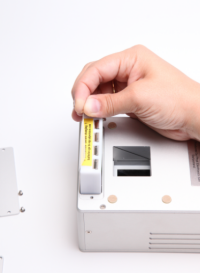
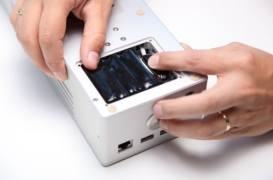
- Remove carefully the white accumulator holder and remove the old accumulators (see picture below)
- Add new accumulators in the accumulator holder. Be careful: you must always change all 8 accumulators and respect the polarity.
- Introduce the accumulator holder into the accumulator compartment. Be careful not to jam, bend, or squash the accumulator cables as this may result in a short-circuit (see picture below).
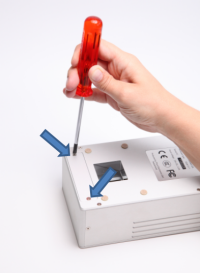
- Use a screw driver to close the accumulators compartments (see picture below)
- Follow instructions here to initialize the new accumulators properly
Change accumulators in Embedded QA with specific accumulators
Specific EQA accumulator packs must be purchased from AlpVision directly. Using accumulator packs from a source other than AlpVision will void the warranty.
To replace the standard accumulator packs please execute the steps below carefully:
- Buy the new accumulators from AlpVision. Be careful: replacing with wrong accumulators may result in the destruction of your device.
- Use a screw driver to open the accumulators compartments (see picture below)
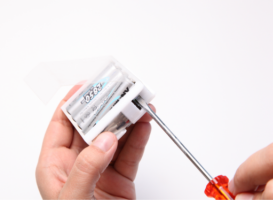
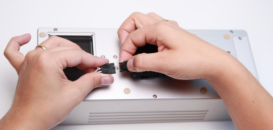
- Remove carefully the accumulator packs from each compartment. Be careful not to pull the cable as it could result in accumulator disconnection from the motherboard.
- Unplug the old and plug the new accumulator packs as in shown in the picture below.
- Introduce the accumulators into the accumulator compartment. Be careful not to jam, bend, or squash the accumulator cables as this may result in a short-circuit (see picture below).
- Use a screw driver to close the accumulators compartments (see picture below)
- Follow instructions here to initialize the new accumulators properly
Procedure to follow after changing the accumulators
After you have inserted new accumulators into the Embedded QA, please follow the instructions below.
- Charge the Embedded QA device during 1 full night
- Use the Embedded QA device between 30 and 45 minutes
- Charge the Embedded QA again (4 hours)
- Use Embedded QA normall
Be careful: totally discharging new accumulators could result in the destruction of the accumulator.
How to extend accumulator live
The best accumulators autonomy will be acquired after 3-4 cycles. To lengthen accumulator life time, avoid discharging completely accumulators. For your information, accumulators producers indicate the maximal number of cycles for a usage with 20% discharge (i.e. accumulators still have 80% of energy).
If the device is not used regularly, it is advised to charge it once every 3 months.
|